Saturday, 18 December 2010

Senior Member Games - Jonathan Sams (2)

Jonathan Sams has always been a member of the Darlington chess club, in fact he joined in 1853, he's not that old, but he has been at the club a long time.  Jonathan is a dangerous player as he demonstrates in the first of our games played by the senior members of the club.  Jonathan is currently ranked number two at the club and has beaten many of the regions finest players at one time or another. 


Play through the game with notes below, or skip to the bottom of the post to play through the game using a chess viewer.


1. e4 c5 2. Nf3 d6 3. d4cxd4 4. Nxd4 Nf6 5. Nc3 a6 6. Be3 g6 

When black has pawns on g6 and d6 in the Sicilian these variations are known as the Dragon. There are many different lines, but one thing is certain: there will be blood. 

Black is mixing systems here, as normally the pawn move a6 leads to the Najdorf. If you put the two together you get the Najagon, only joking its the Dragadorf. The Dragadorf is a trendy line in the Dragon, black players need to know their stuff at club level to make this system work. 
If I were black I would have taken a good look at 6...Ng4 especially if he wants to add g6 later. If black can exchange white's dark bishop leaving his on the board black's position would be very strong.

7. f3


The battle lines have been drawn. White will attack the kingside with his pawns with a mighty attack known as the Yugoslav attack.

7... Bg7 8. Qd2 O-O? 

Simon Williams Writes: 
"Black should delay castling until the situation on the kingside has been cleared up. In some cases Black may even prefer to castle on the queenside. Overall, it makes good sense to develop all the black pieces and wait until events have unfolded before considering castling." 
in his book 'the new Sicilian dragon', which deals with the Dragadorf excluisivly. 

Black's set up should be queen's knight to d7, pawn to b5 and then bishop to b7. Which to pure Dragon players will look quite odd.

9. Bh6 

White now follows a three step plan. 
Step 1 Use his battery on the c1-h6 diagonal to force an exchange of the "Dragon" bishop. This leaves Black weak on the dark squares around his king, ideal for invading white pieces. 
Step 2 Launch his pawns towards Black's king forcing further weakness. 
Step 3 Move the major pieces on the open files or weak diagonals and deliver mate. 

Sounds simple which lead Bobby Fischer to comment 
"White's attack almost plays itself... weak players even beat Grandmasters with it." in his 60 memorable games. In fact in game 2 of said book he further boasts 
"I have won dozens of skittle games in analogous positions and had it down to a science: pry open the h-file, sac, sac ... MATE!!" 

We will see how Jonathan emulates Fischer.

9... Nc6 10. Bxg7 Kxg7 
Step 1 complete.


11.Be2 

11.0-0-0 is stronger here, as if the game proceedes as the actual game did white will continue his attack, but with an extra move, if the game takes a different path then Be2 can be added later.

11... Qb6 


Black focuses an attack on White's central knight forcing it to move. I can't fault the logic here and the position seems balanced, so black is doing ok, its just the queen is rather in the way of black's counter attack starting with b5. 
The absolute golden rule for black players in the Dragon is start an attack on the queen side. Perhaps Bd7 and then rook c8 are the natural moves.

12. Nb3 Be6 13. g4 


Step 2 underway. White doesn't fear Bxb3, but that could be Black's best defense.

13... Ne5 

The side with the least space usually does well to exchange pieces and this line has to be considered. Perhaps 13...Ne5 is the games turning point. Black wants to find a way to force two pieces off and leave the c-file clear, but his plan is too slow... 13...Bxb3 14. axb3 Qd4 15.O-O-O Qxd2+ 16. Rxd2
Game analysis

14. g5! 

If possible continue with step 2.

14... Nh5 15. O-O-O 


The rooks will be needed for step 3.

15... Nc4 16. Bxc4 Bxc417. f4! 

White will not be side tracked from his plan. 17.f4 may not be the best chess move on the board [Fritz prefers Nd4], but sticking to your plan is vital if at all possible. White's attack is starting to look decisive.

17... Bxb3 18. axb3 Rac819. f5 


Each pawn move increases the danger for black. For most club players this pressure is too much and cracks quickly appear.

19... Rc6 

Black bravely counters white's attack by doubling on the c-file. I'm sure black has the exchange sacvifice Rxc3 in his mind. But his attack will always be slower than White's. Perhaps 19...Qa5 is better, as there is danger for white on a1 in some lines, but the queen can swing over to the king-side if necessary for defensive duties.

20. Rhf1 

White continues with step 2 in preparing f6 with the rook supporting, but also step 3 is now in the pipeline.
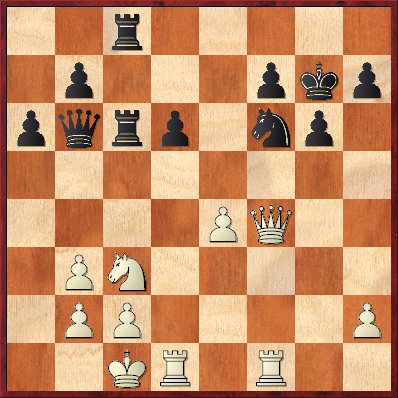
20... Rfc8 21. f6+! exf6 22.gxf6+ Nxf6 23. Qf4! 


In a flurry white has completed step 2 and implemented step 3 at top speed. White could have tried the flashy 23.Rxf6 as black can't take due to 24.Nd5+. Black could complecate the issue with 23... Rxc3 and things are looking complicated. White rejects complications in favour of his grand 3 stage plan. If you have a plan stick to it, unless there is a very good reason not to.

23... Nh5? 

Fritz sees 23...Qd8 which keeps black firmily in the game. With the text black's king is hopelessly exposed and the attack plays itself.

24. Qxf7+ Kh6 25. Rd3 

White prepares to swing his last heavy piece into the action. As a bonus the rook hels protect the knight on c3.

25... a5? 

Black is out of ideas.

26. Rh3 


All of white's heavy pieces aim at an exposed king, at club level, these attacks never fail. NEVER.

26... Qc7 27. Qf4+ Kg7 28.Rxh5 


Don't be afraid to sac to clear lines, as if there is enough force there is usually a way to win.

28... Rxc3
28... gxh5 29. Qf6+ Kg830. Rg1+ Qg7 31. Qxg7#

29. Qf6+ Kg8 30. bxc3 Qxc3 

30...gxh5 is the same result as the note to 28.
31. Qf7+ 

31...Kh8 32.(R or Q) xh7 mate 1-0


Junior Club Week 9: Focus its an attack

In the last lesson we looked at the options available to us when we find ourselves in check.  Remember Move, Block or Capture.  Don't panic - Stop, Think, Evaluate and then Move.

This week we discussed a focus attack.  Before we go any further I will share a game played between AJ the grinder and my wife Sarah.

1.e4 e5, 2.Bc4 c5? 3.Qh5? Nf6??
Black's last move was a huge mistake.  White now played 4.Qxf7 #.
If you look at the above diagram you will see that White's bishop and Queen both point at the f7 square.  We call this type of attack a Focused attack.  Both of White's pieces attack the same point.

A Focused attack is where two or more pieces gang up on one point in the enemy camp.

In the above game Sarah failed to spot the focused attack and continued her development.  After each move by your opponent you have to ask yourself some questions:
Does his last move threaten anything?
Has he got any checks?
Has he left something in his camp unguarded?

When we discussed the options for check things were simpler because the game can not continue until you are out of check.  For this week's topic we first have to realise that we are under attack.  As stated above try to ask yourself what your opponents last move changed.  If you spot a Focused attack then you have four options.

Move, Block, Capture or Protect.  Similar options to check, but with the addition of protect, also like check we need to Stop, Think, Evaluate and then Move.  Lets return to the above game:
So, White has just played 3.Qh5.  Black asks what is white threatening?  He notices that both White's bishop and queen Focus an attack on the pawn at f7.
STOP
THINK - In this stage we look at all the possibilities in our four sections:

Move - There are none as the pawn on f7 is pinned by the queen, moving it is illegal.

Block - There are two blocks we must consider each one in turn
The tempting 3...g6
3...g6 is tempting, as it blocks the Focused attack and attacks White's queen, but white has 4.Qxe4 forking king and rook winning the rook for free.  Try to evaluate each position on a scale of good, ok or bad.  I would say losing a full rook is bad.
Evaluation: Bad.

Next block is 3...d5
White can simply take the d-pawn and we still need to solve the Focused attack question posed by white.  Evaluation - Bad as nothing has been achieved.

Capture - None

Protect - There are three ways to protect the pawn.
3...Nh6
Black protects the pawn at f7 and stops a checkmate, but the pawn on e5 is undefended.  White has the option of Qxe5, or attacking f7s protector with d3, or d4 (Reveals an attack by the bishop on c1).
Evaluation: Bad as black still seems in trouble.

3...Qf6

Black has protected f7 and e5 at the same time.  This looks good.  After we have solved the Focus attack we need to activate our pieces.  The best square for the knight on g8 is f6, but that is where we have just placed the queen.
Evaluation: Good, with one small drawback.

Just because we have found a good move doesn't mean we just play it.  Look at all the options first.

3...Qe7

Again black protects f7 and e5.  Next move he can chase the white queen with Nf6.  It all seems good.
Evaluation: Good.

As we have finished looking at each of our options we have to try and decide which move had the best evaluation.
Move
3...Qe7 wins.

So Remember
Ask yourself what your opponents last move did.  Does it attack anything, are they any checks, has he left anything unguarded?
If you notice a focused attack you have four options: Move, Block, Capture or Protect.

Stop, Think, Evaluate and then move.


---------------------------------------------------------------------------
Contact me at 

  •  Spot any mistakes with this post, 
  •  Would like to help run Darlington Junior club 
  •  Want any advice on creating a junior club
  •  Have any coaching ideas

Tuesday, 7 December 2010

Junior Club: Snowing in the wind

Hi,

Due to the heavy snow the club was cancelled 30/11/10.  There was a club night last night (06/12/10), but many regulars were not there, so there was no lesson.


Unless there is further snow the club will be on next week(13/12/10).  This will be the last junior night of the year.  Although there will be a Christmas fun night on the 20/12/10.  With a bug-house chess challenge.

Bug-house chess is played in teams over two boards.  essentially its the same as normal chess except when your team mate captures an enemy piece you can add that piece to your board!!  Come and join the fun.

Saturday, 20 November 2010

Junior Club Week 8: Check! Your options.

If you find yourself in check there are three ways to get out of check: Move, Block or Capture.


MOVE
In the below position black is in check.  He only has one option, to move, in this case to h7.

Block
In the next position black is in check, but this time his only option is to block with his bishop.

Capture
To complete the three options we can see that black, in check again, must capture the rook to get out of check.


It's all so easy when there is only one option.  But what if all three options are available?  A lot of younger players when hearing check grab their king in panic.
When you find yourself in check don't panic Stop, Think, Evaluate and then Move (STEM).

Let us consider an example

We have just heard black announce check.  Step one Stop.  Do not touch your king.  Resist the urge to move your king as your first option.

In chess it is best if we consider all the best options we have.  We should do this for all moves, but sometimes there are so many options it can be confusing.  When we find ourselves in check things are simpler, we have to get out of check.  We know we have three options.  Take your time try and think of all the possibilities for each of the three ways to escape check.
What you should do is create a mental list, this is the thinking.

Move 
There are two different squares the king can move to
1.Ke2

Try to say in your mind why this is good or bad.
Good, not many good points except we are out of check.
Bad, Remember week 7 A.C.K.S.?  The king in the centre is not safe.  The king is also blocking the bishop from activating.
Next move option is 1.Kd1
 Good: None
Bad: Again the king is not safe, but look at the black queen's X-ray vision.  Looks scary to me.

Block
White can block with 1.c3


Good: The pawn blocks the check while attacking the bishop.  After the bishop moves white should be able to find time to castle his king to safety.
Bad: Forcing the bishop to move will probably result in 1...Bd6 where the bishop attacks the queen.


Capture
White does have 1.Qxb4


Good: We have got rid of the bishop.
Bad: Black's knight can capture the white queen.  we don't want to lose a queen for a bishop.
{Tip:- Even though the capture is silly it is still worth thinking about.  One of these days a capture will be the best move}


Now that the list is complete we have to try and weigh the options against each other.  Think of the good and bad points like weights on a set of scales.  Which ever option has the most good points is the move we choose.  This process is what chess players call evaluation.

We should have selected a move by now.  In the above example the block 1.c3 had the most good points, so won easily.

Remember when you hear check  Stop, Think, Evaluate and then Move.
---------------------------------------------------------------------------
Contact me at 

  •  Spot any mistakes with this post, 
  •  Would like to help run Darlington Junior club 
  •  Want any advice on creating a junior club
  •  Have any coaching ideas

Sunday, 14 November 2010

Junior Club Week 7: Opening - First steps

At the start of the game both armies face each other eager to do battle.  
The first few moves are known as the opening.  There are many rules and guidelines to help us open a game of chess correctly.

This lesson introduces 3 very simple rules that help us to open a game correctly.  Perhaps you can remember them as A.C.K.S.  (say axe).

Activate – No army can win a battle if it lazes around at home.  The armies’ fighting units need to get into the battle.  In chess this relates to getting the knights and bishops out.  We should aim to get them all out, so try not to move a piece again once it has been moved.  Unless of course it is under attack, or your opponent has left a piece unguarded piece ready to take.
 
Centralise- The 4 central squares are the most important on the chess board.  
The reason is movement.  The player who controls these 4 squares the best can use them to move his pieces around the quickest.  Pieces should be moved towards the centre wherever possible.  
The very best way to control the centre is to move one of your pawns to a central square.  Try to move your pieces before pawns, but to get the bishops out you have to move a pawn, so might as well move a central pawn.

 King Safety – As the king is the most important piece we want to get him safe.  We are lucky as there is an easy way to do this by castling.  

Here are the first few moves of a game.  White is a player using the axe (ACKS) system, black is making it up.
  1. e4 - White allows his bishop to move and lands a pawn on one of the central squares.
1… h6 - Black has moved a pawn it doesn’t control the centre and it doesn’t allow a piece to activate.

  1. Nf3 - Activates a knight towards the centre.
2…a5 - Another pawn move!  It doesn’t control the centre, or allow piece activation. 

3. Bc4 – Activates the bishop which aims at one of the centre squares.  The bishop also points dangerously towards black’s king.  Once the king’s bishop and knight have moved the king can castle into safety.
3… e6 – Black’s third pawn move.  At least black clears a path for his king’s bishop so it can finally activate. 

 4. 0-0 – The white king finds safety and as a bonus the rook comes towards the centre.

4… Na6 – Hurray!  At last black activates a piece.  It would have been even better if the knight had activated towards the centre.


5. Nc3 – White’s queenside knight leaps into the battle, both active and central.
                        5… d6 – Yet another pawn move.

6. d4 – As white needs to active his queen’s bishop the d4 pawn needs to be moved.  With d4 we see the pawn opening a path for the bishop, but also occupying a central square (d4) and controlling another (e5).

6… Ne7 – Black activates a knight towards the centre.  Has black finally caught on?


7. Be3 – White’s last piece joins the battle.  The bishop supports the pawn on d4 which makes white’s centre even more powerful.

7…Ng6 – Black’s knight moves  a second time, it is best to move each piece only once unless there is a very good reason not to, such as it is under attack.

8. Re1 – All of white’s pieces are out, so he can start thinking about the rest of his opening.  Centralise the rooks and activate the queen are the next steps.  More on this later.

8… Nb4 – both of black’s knights have now moved twice.  This type of move looks tempting as the knight seems to threaten white's position, but really black’s knight can be easily chased back with 9.a3. 


White is better and can now plan an attack.


Contact me at 
  •  Spot any mistakes with this post, 
  •  Would like to help run Darlington Junior club 
  •  Want any advice on creating a junior club
  •  Have any coaching ideas
-----------------------------------------------------------------------------------------------------
Last week's puzzle was:


1.Bxc6! is the winning move.  
The bishop forks king and rook, but if the queen captures the cheeky bishop then 2.Qd8 is checkmate.
In this puzzle we had to combine different ideas (fork, removal of the guard and checkmate) to find the answer.  We will discuss this more later.

Friday, 12 November 2010

Junior Club Week 6: Removing the guard and deflection

Last week we looked at the overworked piece.
Removing the guard is a similar idea in that a piece's defender is removed, in this case taken to allow the second attacked piece, now undefended, to also be captured.

If you are attacking a defended piece look to see if you can remove its defender.

In the diagram below white has developed his pieces correctly, unfortunately in chess we have to be on guard for tricks at all times.  White's bishop on g5 is defended by the guard on f3.  Any ideas?


Did you spot 1....Bxf3, 2.Bxf3 Qxg4, see below.  Black wins a piece.


Sometimes an attacked piece is guarded by another piece, but that defending piece is also under attack, but by a higher valued piece.  Normally you would not take a knight(3) with a rook(5), but if this allows the second piece to be removed you will have gained material.  An example of these hard to spot removal of the guard cab be seen below.

After 1...Rxf3 2.gxf3 Rxg5, see below, black has gained material.

There is a third scenario when removing a guard.  Often we can not capture a defending piece, but we can move it from its defending square.  Take a look at the diagram below.


The black king is defending his queen.  A lazy move by white is queen takes queen, we must always look for the best move.  Remember "If you are attacking a defended piece look to see if you can remove its defender."  We can remove the guard using another powerful tactic called deflection.  Instead of capturing the guard we can drive it off.  Look at the diagram again after 1.Rg7+! the black king has a choice, capture the rook and neglect its guard duties, or hide, in this case on e8 leading to checkmate.

After 1...Kxg7 the black queen is undefended and 2.Qxe7+ wins the queen for a rook, see below.

With the introduction of deflection we have stepped up.  Our chess knowledge now contains enough tricks to play at a very high level.  Deflection can be very powerful especially combined with other ideas.

In the below position it is black to move.  Black is winning, but he needs to find a way to queen the pawn on b2.  Take a look.  Think which piece is guarding against 1...b1Q?  Can that piece be deflected?


Did you spot 1...Rc5+ 2.Rxc5 b1Q?  If you did you are progressing well...

Now its time for the weekly puzzle this week from "303 Tactical chess puzzles" Wilson & Alberston.
Try to find a deflection trick.  Be warned this solution combines different ideas.
I will publish the answer with my next post.  If you can't wait for then and can't find the answer email me 

Contact me at 

  •  Spot any mistakes with this post, 
  •  Would like to help run Darlington Junior club 
  •  Want any advice on creating a junior club
  •  Have any coaching ideas
-----------------------------------------------------------------------------------------------------
Last week's puzzle was: 

Black's pieces seem to protect each other, but the truth is they are all dependent on each other, which means they are all overworked.  White can demonstrate this with
1.Rxh7.  Black now has two choices
A. 1...Rxh7 2.Rxg8
B. 1...Rxg1 2.Rxh8 
In both cases black has lost a piece. 

Thursday, 4 November 2010

Junior Club Week 5: Overworked Piece

"No man can serve two masters."

This is also true on the chess board.  If a piece or a pawn has to defend two of its own pieces from attack then it is overworked (also known as overloaded), often this leads to the loss of one of those defended pieces.

In the following position it is black to move.  All of white's pieces are defended at least.  True, but the knight on d1 is defending both the bishop on b2 and knight on f2. The knight is overworked.  What would you play?


Did you spot rook takes bishop, or rook takes knight?  After white recaptures black's rook is able to take a second piece.

If you look back at the original position you might not have spotted rook takes bishop as a rook(5) is worth more that a bishop(3), but black also wins a knight(3) after white plays knight takes rook.  Therefore white has gained 6 points from his 5 point investment, but looks set to collect even more material.

Taking a lower valued piece is hard to spot sometimes, but always be on the lookout for pieces overworking.  If you spot an overworked piece take a second look at any captures you have, often you will  have to invest some material for a healthy return.

Take a look at the following position it is white to move.  First look for the black piece that is overworked.  Once identified you should be able to see a good move.


The rook on e8 is protecting the bishop on a8 and its rook partner on e3.
Did you spot rook takes bishop?  If the rook on e8 recaptures then the rook on e3 has no defender.


 A piece can also be at work protecting an important square, perhaps stopping a checkmate.  If that piece also has a job protecting another of its own pieces it is overworked.
Look at the following diagram.  It is white to move.


Black's rook on d8 is overworked.  It is protecting its partner on d7, but it is also protecting the e8 square, as if a white rook lands on e8 without getting taken it is checkmate.

We can now see that the amazing queen takes rook on d7 wins a rook.  As rook takes queen allows Re8 checkmate.  See below. 


The following is a position from one of my games, I am black and it is my move.
Can you spot the overworked piece?


Did you spot that the bishop has two jobs.  One to guard the knight on f1 and secondly to stop the rook getting to the e1 square.

I played 1.Qxf1+! (looks crazy to take a knight(3) and let the queen(9) be taken).  But after 1...Bxf1, 2.Re1 Check mate.

Here is a puzzle.  This week from "Winning Chess" Chernev and Reinfeld

Try to find the overworked piece and then the solution should come easily.
I will publish the answer with my next post.  If you can't wait for then and can't find the answer email me 


Contact me at 

  •  Spot any mistakes with this post, 
  •  Would like to help run Darlington Junior club 
  •  Want any advice on creating a junior club
  •  Have any coaching ideas
-----------------------------------------------------------------------------------------------------
Last week's puzzle was: 


White to move.  First he has to create the possibility of a discovered check with 1.Bd1 black can then try:
A, to run with his king to 1...Kh5 (1...Kh4, 2.Rh3 checkmate), 2.Rf8+ Discovered check and wins the rook, or
B, to check with the rook by 1...Rxa2+, which looks like a good try but, 2.Rf2+ blocking black's check and discovering a check on black's king also wins the black rook next move.