In using the king part 1(Click here) we discussed the opposition and rolling the enemy king out of the way to allow the pawn to march through.
In using the king part 2 (Click here) we saw how the defending side could draw. We looked at the position that our king needs to be to guarantee a win, calling these squares key squares.
This week we will look a little more at those key squares, then we will look at rook and knight pawns. The rook pawn is the pawn that sits in front of the rook in the starting position, that is a pawn on the a or h file. Likewise a knight pawn starts the game in front of a knight the b or g file.
In the following position it is White to move. Remember we claimed that a king on a key square wins regardless who has the move
You may notice that Black has the opposition, so White can not roll the Black king, as say 1.Ke5 Ke7 allows black to keep the opposition. What White needs to do is to gain the opposition. The correct way to do this is to move the pawn and not the king, which is the reason we needed the king two squares in front of the pawn.
1.d4! Kc7, 2.Ke6
It doesn't matter where Black moves White wins
A 2...Kd8, 3.Kd6 Kc8, 4.Ke7 Kc7, 5.d5 and the pawn promotes
B 2...Kc6, 3.d5+ Kc7, 4.Ke7 (4.d6 also wins, but note how the king covers the queening square, this is good technique) and the pawn promotes
C 2...Kc8, 3,Ke7 Kc7, 4.d5 and the pawn promotes
D Any king move to the b-file allows 3.d5 and 4.Ke7 and the pawn promotes
Here is another example. White to move. What would you play?
Of course the aim of these endings is to get the pawn to promote to a queen, but always remember to use the king!
The careless 1.d4?? allows 1...Kd7! when White can not get his king to a key square.
Play may continue 2.Kc5 Kc7!, 3.d5 Kd7, 4.d6 or any king move by White which allows black Kd5 and we have set up last weeks drawing position.
Remember Black moves his king straight back so he can gain the opposition next move. So lets return to the original position.
Correct is 1.Kc6 using the king and we would have a very similar position to the first example.
Get a board, place the two kings on random squares and add a pawn also at random. Try and work out if the enemy king is outside the pawn's square. If not use your king. Can the attacker get to one of the key squares? Practice this technique until its sealed in.
So far I have used examples where the pawn is in the centre of the board. That is because life is easier for those pawns. The rooks pawn is much more difficult.
So what's the problem? Well take a look White can not roll the Black king!! Black can just play Kb8 and Ka8 and force a draw.
To win with a rook pawn White needs to be able to get his king to either b8 or b7, simple as that.
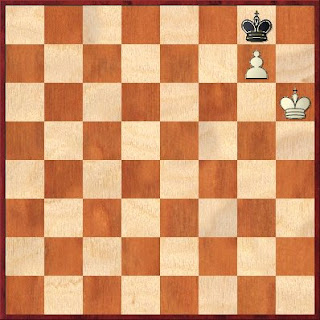
Now for the tricky knight pawn. Its Black to move 1...Kh8, What do we play?
Did you want to play 2.Kf7? White can still win from this position, but there is a stalemate trap lurking so be very careful, simpler is Kh6 which we will return to after looking at the trap.
2...Kh7, 3.g5 Kh8
If White tries 4.g6?? then Black is stalemated and the game drawn. White must try Kg6 from the diagram, but the winning technique from here is a little difficult, perhaps another time...
That is why from the original diagram after 1...Kh8 we play 2.Kh6 with the idea of marching the pawn onwards!
2..Kg8, 3.g5 Kh8, 4.g6 Kg8, 5.g7 and Black can no longer hide in the corner
Black's king must play 5..Kf7 allowing White to control the promotion square with 6.Kh7. This technique is known as the squeeze and can be used for any pawn.
You now have all the tools to win a pawn and king v king ending. Remember the best thing to do is practise.


No comments:
Post a Comment