Sunday, 6 March 2011

Junior Club Week 16: End games - Rook v King

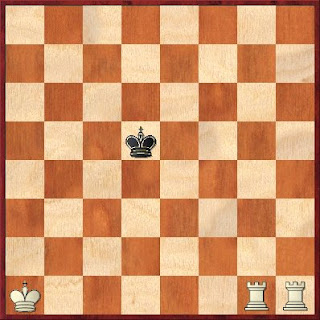
Remember the lesson on two rooks v the king?  If not see week 14.  We started from the below position:

King with two rooks

Do you remember how we started?  Make a box with 1.Rg4 restricting the Black king to his half of the board.  This week we are going to take away one of the rooks!
The winning technique is exactly the same, trap the king, check with the rook from the side and force him to the edge of the board where we can call mate!

Before we get started take a look at the below diagram.


The kings face each other.  We call this the opposition.  Technically the player that has just moved into this position has the opposition, but we don't need to worry about that for now.  The important point is that the kings can not move forward.  The only option is sideways or back.

To checkmate with only a rook we need to follow a three point plan.
  1. Box in the king with the rook
  2. Move the king until we get the above opposition position
  3. Call check from the side with the rook forcing him backwards
Repeat the above plan until the king is at the edge of the board when the final check will be mate.
So the starting point with two rooks was:


Notice that one rook has gone.
Step one: box the king with 1.Rh4


Black can either move his king backwards, or stay on the fifth rank.  Most players desperately move their king towards the rook hoping the side with the rook will allow the rook to be captured.
1...Ke5
Step two: Move the king to get into the opposition. 2.Kb2
Black continues his march towards the white rook 2...Kf5, white should continue step two with 3.Kc3 Kg5


**** WARNING ! WARNING! Rook under attack alert.  ****

Always check the safety of the rook.  Just as we did for the two rook process, leave the rook on the same rank, but move it as far from the enemy king as possible. 4.Ra4 Kf5


Now what?  If you wanted to play Kc4 or Kd4 go to gaol and do not collect £200!  Never ever, move the king in front of the rook's guard line, in this case all along the fourth rank.  If we want to get the kings to face each other we must move towards the black king with  5.Kd3 Ke5


Now what?  6.Ke3 right?  No that would be a mistake, although the kings face each other, remember we call that the opposition, black can simply annoy us with 6...Kd5 and we are no further forward.  So we have to find a move that doesn't really change anything on the board.  We call these moves waiting moves, made by the rook.  Keep on the same rank and just shuffle one square, if it is safe to do so.  That is 6.Rb4 Kf5 (Black is going to make us work hard for the win.)


We are still in step two.  Chase the black king he will eventually run out of board and have to move into the opposition, 7.Ke3 Kg5, 8.Kf3 Kh5 9.Kg3 Kg5


The kings are in opposition and its our turn.  Finally we can perform step three: 10.Rb5+ Kg6


Step three actually performs step one as well as the rook check forces the black king back and now the rook guards the fifth rank.
We continue with step 2 then, if possible move the king forward, so that the king is between your rook and the enemy king.  In this case 11.Kf4, if black tries to harass the rook with 11...Kf6 we can move straight into step three, 12.Rb6+ Ke7


 Best move now is 13.Ke6.


If black runs to the edge with 13...Kf7 we waste a move with 14.Ra6.  If he chases the rook we swap the rook over to the other side of the king 14.Rh6.
Let's choose 13....Kf7 for black, then p[lay continues 14.Ra6 Ke8


The black king has moved backwards.  When something strange happens at the board, take extra time to work out what to do.
Remember the three point plan.
  1. Box in the king with the rook
  2. Move the king until we get the above opposition position
  3. Call check from the side with the rook forcing him backwards
Black has moved back for us, so we are back to 1.Box in the king with the rook.
15.Ra7 Kd8, 16.Kd6 Kc8


 Swap the rook to the other side with 17.Rh7.  Black is now doomed.  17...Kd8 would see the kings in opposition and then we can call checkmate on h8, so he tries 17....Kb8, we chase with the king 18.Kc6 Ka8
19.Kb8 the black king has no where to go, so is forced into 19...Kb8 when 20.Rh8 is checkmate!!!


Remember the three point plan.
  1. Box in the king with the rook
  2. Move the king until we get the above opposition position
  3. Call check from the side with the rook forcing him backwards
With the golden rule to always check the safety of the rook.
Never move the king in the rooks guard line.  Always check from the side.  Remember to shuffle the rook one square as a waiting move, if we need to force black to move.

Practice this technique with your Dad, Mum, Brother, Sister, or even on your own.  Once mastered you can safely say you are now a proper chess player!!


---------------------------------------------------------------------------
Contact me at 

  •  Spot any mistakes with this post, 
  •  Would like to help run Darlington Junior club 
  •  Want any advice on creating a junior club
  •  Have any coaching ideas

Sunday, 27 February 2011

Junior Club Week 15: Competition round 3

Round 3 of the junior competition had the following pairings:

AJ         V        Elizabeth
Harry     V        Aidan
Dylan     V        Caroline

AJ checkmated Elizabeth on board one, but Elizabeth had AJ on the ropes.  I have noticed that Elizabeth starts chess games very well and is a competent player, but drifts after the middle game with no plan (sounds like you?).  Hopefully we can help her focus her ideas and I'm certain she can become a class player.  AJ has become the big fish in our little pond.  He is 9!

Aidan finally overcame Harry in a  hard fought game that went into a winning endgame for Aidan.  Aidan was gracious in victory which is as important as being gracious in defeat.  As well as being a top chess player he's a top bloke too.

Dylan who is 5 over powered Caroline 7.  I was pleased to see Caroline competing in the competition, as she has just started coming to the club. Her game is noticeably improving and I am sure she will start picking up points soon.

The current standings are:

Number
Name
R1
R2
R3
Score
1
AJ
9w 3
2b 3
5w 3
9
2
Harry
3b 3
1w 1
4w 1
5
3
Dylan
2w 1
5b 1
10w 3
5
4
Aidan
X
7w 1
2b 3
4
5
Elizabeth
X
3w 3
1b 1
4
6
James
X
9w (3)d
X
3
7
Jordan
X
4b 3
X
3
10
Caroline
X
X
3b 1
1
8
Zack
X
X
X
0
9
Sarah
X
X
X
X

Sunday, 20 February 2011

Junior Club Week 14: End games - Two Rooks v King

We have learnt a lot of tricks to help us win enemy pieces.  We have seen the best way to start a game and what to do in checks and focused attacks.  If you put all of that into practice chances are that you will reach a position where you have a massive material advantage.  We need to make sure that we can finish the game off.  Over the next few weeks we will be looking at some basic endgame concepts starting off with two rooks v a lone king, as in the below diagram.


It is white to move.  The first instinct for a lot of players is to call check, but this is a mistake.  The first thing we want to do is create a box for the Black king.  That means using one of the rooks to first trap the king.  Remember week 12, we talked about trapping.  If you look at the below diagram the rook has made a box for the Black king after 1.Rg4


Now Black's king can never walk further up the board, he can either move backwards or travel along the 5th rank.  Lets make a move for Black, say 1...Ke4.


The rook on g4 is busy stopping the king moving out of his box.  Imaging this as a prison and the g4 rook as the prison guard.  Now what?
Make the box or prison smaller.  Leave the g4 rook guard where he is and get his lazy side kick into play.  If the g4 rook is the guard, we call his partner the hunter.  The hunter can call check, but remember the aim is to make Black's king's box smaller and smaller until he runs out of board.  The rook calls check along the 5th rank to push the king even further back up the board.  After 2.Rh5+


The Black king is in check, he can not move forward, so must move backwards.  For example 2..Ke6


Black's king can now only move on the 6th rank or backwards.  The rook on h5 is now the guard.  If you imaging the rooks are climbing up stairs.  They take turns being the guard and hunter.  Once their guard duties have been taken over they can become the hunter and look for a check.  The g4 rook's guard duties have been taken over by the h5 rook, so he is the hunter and looks for the next check shrinking the Black king's box.  3.Rg6+


Black moves 3...Kf7


WARNING, WARNING.  Rook under attack alert!
Do not get careless, or over excited and play 4.Rh7+, because 4...Kxg6 makes Whites job a lot more difficult.  The rook on g6 is under attack, so must be moved.  The g6 rook is the guard and must maintain his guard duties along the 6th rank.  Best is to move the attacked rook as far away from the Black king as possible.  White therefore plays 4.Ra6


Black's king's box is still firmly in place.  Black ties 4...Kg7


The rook on h5 is the hunter and needs to find a check along the 7th rank.  5.Rh7?? obviously lets the king take the rook, so the hunter rook first has to move to the other side of the board ready to call check next move.  Move the rook as far away from the Black king as possible, but do not move onto the same file as the guard rook, as the rooks would then be in each others way.  White's best move is 5.Rb5


The hunter rook on b5 will check on b7 next go and then his partner will finish climbing the stairs by calling checkmate on a8.  There is nothing the black king can do.  5...Kf7 6.Rb7+


6...Ke8 7.Ra8#


Remember

  • First make a box for the enemy king
  • Next the rooks swap roles, climbing the stairs call check in turn making the enemy king's box smaller and smaller.
  • If one of the rooks is attacked move it as far from the king as possible, without placing the rook on the same rank (or file) as his partner rook.
---------------------------------------------------------------------------
Contact me at 

  •  Spot any mistakes with this post, 
  •  Would like to help run Darlington Junior club 
  •  Want any advice on creating a junior club
  •  Have any coaching ideas

Saturday, 12 February 2011

Junior Club Week 13: Competition round 2

Competition round 2


This week there was a good turnout at the club.  Eight children turned up, but one of the new members didn't feel up to a competitive game, so Sarah was again drafted in to make up the numbers.  The child playing Sarah is awarded 3 points regardless of the result.

There were 4 Games

   White             Black
1, Harry             AJ
2, Elizabeth        Dylan
3, Aidan            Jordan
4, James            Sarah

Game 1,
This was the first to finish as AJ quickly saw off Harry.
0-1

Game 2,
Elizabeth started well, but Dylan had plenty of fight left.  Elizabeth has lost several won games in the past, but with the help of a back rank mate was able to convert this game.
1-0

Game 3,
This was the game of the round.  This game looked more or less even, Jordan had won the exchange, but at the cost of a pawn, or two.  Both players were playing well, but time was running out.  I told the players they had a few minutes left until I decided the result based on the point count.  As the night finished I went over to the board and said that after black's move I would adjudicate.  Black then made an excellent move pinning White's rook.  I decided that after the forced exchanges, black would be a rook for two pawns up a three point advantage and declared black the winner.
0-1

Game 4,
Sarah was on full power.  James held is own for a long time, but Sarah eventually over powered him.
0-1 (1-0) Default.

So the table now look like this:

Number
Name
R1
R2
Score
1
AJ
9w 3
2b 3
6
2
Harry
3b 3
1w 1
4
5
Elizabeth
X
3w 3
3
6
James
X
9w (3)d
3
7
Jordan
X
4b 3
3
3
Dylan
2w 1
5b 1
2
4
Aidan
X
7w 1
1
8
Zack
X
X
0
9
Sarah
X
X


The children enjoyed these more competitive games, but things are still not too serious and none of the children were too upset.

-----------------------------------------------------------------------------------------------------

Last week we set the following puzzle, with white to move.

Did you spot that the Black bishop on a2 can be trapped with 1.b3.
Black best is probably 1...Bxb3 (Other moves allow 2.Kb2 3.Kxa2) 2.Rxb3 winning Black's bishop.

---------------------------------------------------------------------------
Contact me at 

  •  Spot any mistakes with this post, 
  •  Would like to help run Darlington Junior club 
  •  Want any advice on creating a junior club
  •  Have any coaching ideas

Sunday, 6 February 2011

Junior Club Week 12: Trapping / Nets

If a piece has no escape route and you can find a way to attack it, then it is Trapped.
In the following example it is black to move.
Look at the diagram and try and find all the squares the white knight could hop to. 
Did you notice that all the knight's advanced squares are guarded by black pawns and any retreat squares are occupied by white pawns.  As black can move his e-pawn to e5 attacking the knight, the knight is trapped.

Taking away a knight's advanced squares is the best way to reduce the knights power.  Even if you can't trap the knight you can render it useless.  Each chess piece has its strengths and weaknesses.  The rook for example is susceptible to diagonal attack especially early in games when more closed position restrict the rook.
In the next example it is white to move.
 White has given up a bishop on f7 to deflect the black queen from e7.  Now the queen can enter the black camp at b7 and trap the helpless rook.
Black's poor rook has been betrayed by his own pieces and is trapped on a8 waiting for the queen to capture it on the next move.

Nets are used to catch fish, but they can also be used to catch chess pieces.  First a net is cast around an enemy piece, until it is trapped.

An example game:
1.e4 c5, 2.Nf3 Nc6, 3.Bb5

There are many lines where the bishop is well placed on b5, but here the bishop can easily be chased away.
 3...a6 4.Ba4??
The innocent bishop retreat leads to one of the most famous nets in chess the Noah's Ark trap.
4...b5 5.Bb3 (the bishop is trapped)
5...c4

So far we have seen the knight, rook and bishop become trapped.  Next will be the queen.  Be warned although the queen is the most powerful piece, she can often become trapped, especially if she advances into the enemy camp without support.
Take a look at the next example.  It is black to move.

After 1...Nb5 the white queen has nowhere to go and can be attacked by the black rook at a7, so it is hopelessly trapped.  
 White has no good moves to make.  He can try making an escape route with 2.Bh3, but  its too late 2..Ra7 and the white queen is doomed!!


When creating a net first we have to make sure the target piece can not escape before we move in for the kill.  The only piece we have not covered is the king.  If we trap the king it is checkmate.  We will not discuss mating nets this week, but we will revisit them in later weeks.
Remember to lookout for any pieces that can be trapped and if you are hoping to checkmate first cover the king's escape route.

Now for a puzzle.  This week from 303 Tactical chess Puzzles, Wilson and Alberston.
It is white to move.  Try and identify a piece with a limited escape route.  Can you find a way to cast the net to first block the escape route trapping it and then moving in for the kill.
Answer next week, or contact me below for the solution.


---------------------------------------------------------------------------
Contact me at 

  •  Spot any mistakes with this post, 
  •  Would like to help run Darlington Junior club 
  •  Want any advice on creating a junior club
  •  Have any coaching ideas